On-Call Scheduling (Starter Feature)
Last updated: 2026-06-26
On-call scheduling lets you define a rotation (daily/weekly/custom shift length) so new incidents are automatically assigned to the right person — and escalated through multiple levels if no one responds in time.
It also supports shift-start notifications, one-click acknowledgment from email, override conflict detection, a visual Gantt timeline, and iCal calendar subscriptions.
If you want the process side as well as the product setup, the University on-call hub covers rotation design, handoffs, escalation policies, and alert-fatigue reduction.
Where to Find It
For a shared team schedule:
- Open Teams.
- Select the team from the team switcher.
- Open Operations → On-call → Schedules.
This view only shows schedules linked to status pages in the selected team.
For your personal responder view, return to the main dashboard and open My On-Call.
Direct personal URL: /user/on-call/schedules
Team On-Call vs. My On-Call
| View | Purpose |
|---|---|
| Team → Operations → On-call | Configure and review schedules for the selected team’s linked status pages |
| My On-Call | See schedules you participate in and personal or unassigned schedules |
The top navigation also shows an On-Call indicator while you are actively on shift, giving you quick access to the active schedule.
Key Concepts
Schedules
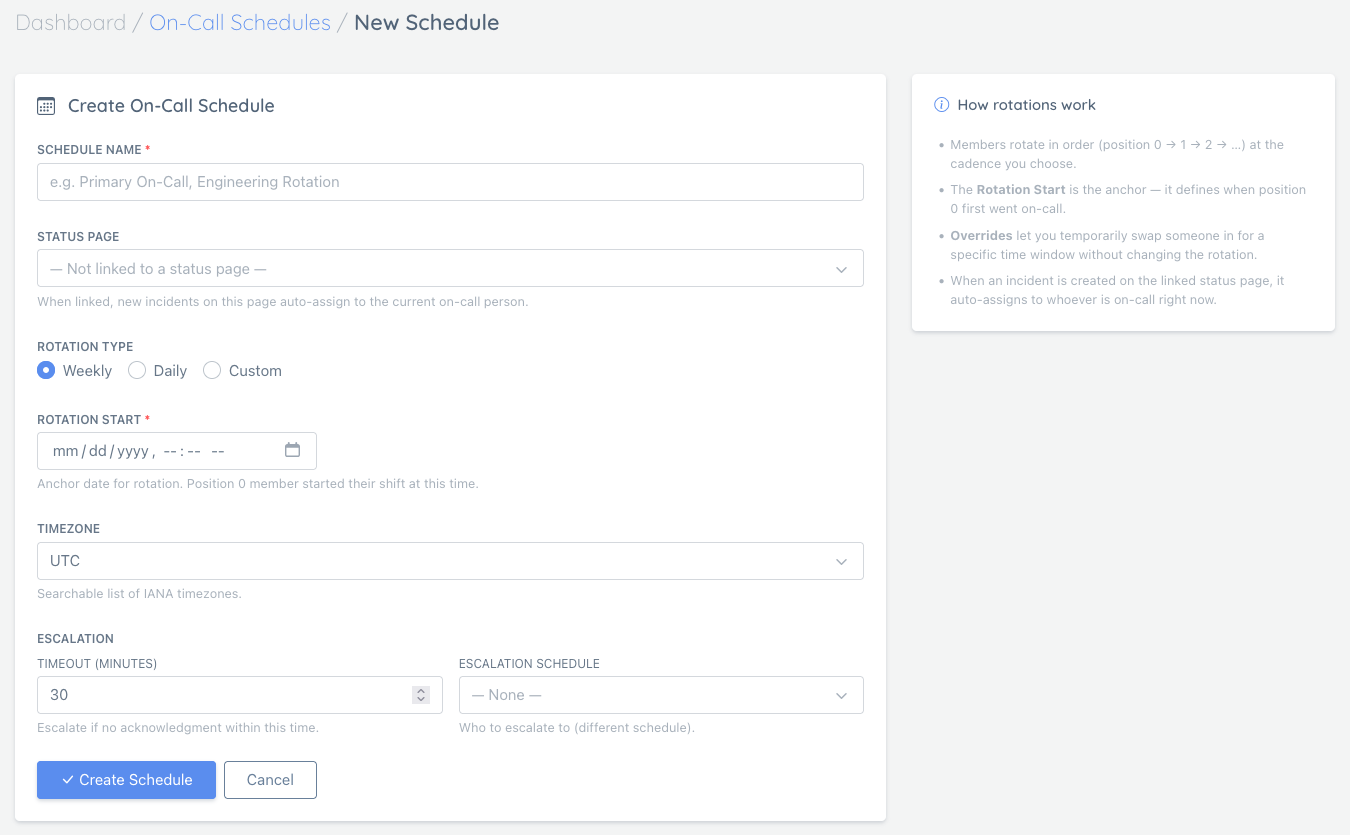
A schedule defines:
- A rotation type (Weekly / Daily / Custom hours)
- A rotation start timestamp (the anchor for the rotation)
- A timezone (IANA timezones like
Europe/Paris,America/Los_Angeles) - An optional escalation policy (multi-level)
Linking a Schedule to a Status Page
A schedule created in a team workspace must be linked to one of that team’s status pages.
When linked, new incidents created on that status page auto-assign to whoever is on-call right now.
To create a team schedule:
- Select the team.
- Open Operations → On-call → Schedules.
- Click New Schedule.
- Select one of the team’s linked status pages.
If no status pages are available, the team owner must first link one under Operations → Status pages.
Personal or unassigned schedules can still be created from My On-Call. A status page already linked to a team must be configured from that team workspace.
Related incident docs: Creating and managing incidents
Related operational guidance: University on-call guides
Members
Members are the people who rotate in order (position 0 → 1 → 2 → …).
If a schedule has no members, there’s no one to assign to.
Team members can view schedules associated with their team. Only the account that owns a schedule can edit its rotation, overrides, escalation policy, routing, or settings.
On the schedule detail page, use the + button in Rotation Members to open the inline Add Member composer. It scrolls into view automatically, focuses the member selector, and can be collapsed again with Cancel or by clicking the button a second time.
Overrides
Overrides temporarily swap in someone for a specific time window without changing the underlying rotation.
Conflict detection: if you try to create an override that overlaps an existing one, you’ll get a clear error instead of a silent duplicate.
What Triggers On-Call Assignment
On-call assignment happens when an incident is created for a status page that has an active on-call schedule linked.
This includes:
- Manual incidents you create in the dashboard
- Auto-incidents created by monitor failures
Email Notifications
All on-call emails include a “View schedule →” link back to the schedule detail page.
Assignment and shift-start emails also include a 7-day schedule table showing who is on-call each day (color-coded: blue = today, amber = override).
Shift-Start
When the rotation moves to a new person, they automatically receive:
- A “Your shift has started” email with the upcoming 7-day schedule
- A Slack / Discord / Telegram channel notification (if a notification channel is configured for the linked status page)
This happens within 60 seconds of the shift boundary — no manual action required.
Schedule Changes
Whenever the schedule is modified (member added/removed, override created/deleted, settings updated), all current rotation members receive a “Schedule updated” email with a description of the change and the new 7-day schedule table.
One-Click Acknowledge from Email
Assignment emails include a signed Acknowledge link. Clicking it marks the incident acknowledged immediately — no login required. The link is single-use and expires in 48 hours.
Every acknowledgment — whether via the one-click email link or the dashboard UI — is recorded in the schedule’s Alert Log so you have a full audit trail of who acknowledged, when, and through which channel.
If you send a Test Alert to a rotation member, the Alert Log refreshes automatically so the new test entry appears without requiring a manual refresh.
“Take On-Call Now” Button
On the schedule detail page, any eligible team member can click Take On-Call Now to immediately become the on-call person for the rest of the current shift. This creates a self-override that expires when the natural shift ends.
Multi-Level Escalation
Each schedule can have an ordered Escalation Policy (step 1 → step 2 → step 3 …).
| Setting | Description |
|---|---|
| Escalate after N min | How long to wait for acknowledgment before firing this step |
| Target schedule | Reassign to that schedule’s current on-call person |
| Target individual | Reassign directly to a specific person (bypasses rotation) |
Each step targets either a schedule (dynamic — whoever is on-call at that moment) or an individual (fixed — always the same person). Leave the target blank to re-notify the same schedule without reassigning.
How it works:
- Incident is assigned to the on-call person (step 0).
- If not acknowledged within step 1’s timeout → incident reassigned to the step’s target (schedule’s current on-call person or the named individual); timer resets.
- If still not acknowledged → step 2 fires, and so on.
- Once acknowledged at any level, no further escalation occurs.
You can add, reorder, or remove steps at any time from the Escalation Policy section of the schedule detail page.
When a schedule has no escalation steps yet, the empty-state message remains visible and Save Policy stays hidden until you add the first step.
Incident escalation preview
On incident pages linked to an active on-call schedule, StatusPage.me can also show a live escalation preview.
That preview helps answer:
- whether escalation is configured at all
- whether there is a next escalation target
- whether escalation is paused because the incident was acknowledged
- when the next escalation is expected to fire
- who the next target will be
Depending on state, the incident page may show messages such as:
- Escalation is not configured for this incident
- No next escalation step configured
- Incident has been acknowledged — escalation on hold
- Next escalation in Xm -> target
This makes it easier to verify escalation behavior without opening the schedule editor in another tab.
Visual Gantt Timeline
The schedule detail page shows a 14-day color-coded Gantt chart:
- Blue — standard rotation slot
- Amber — override slot
- Today is highlighted
This gives an at-a-glance view of who covers each day across all team members.
Calendar timezone display
The calendar header shows the next handoff as an absolute time in the currently selected timezone.
Changing the calendar timezone does not move the underlying handoff event. It only changes how that handoff time is displayed for the selected timezone.
Click-to-Assign
Click any day cell in the Gantt chart to open a user-picker dialog showing all eligible team members (avatar, name, email). Selecting a person immediately creates a full-day override for that day.
- If a conflicting override already exists for that day, you will be prompted to replace it.
- The change takes effect immediately and the page reloads to reflect the new assignment.
iCal Calendar Subscription
Each schedule exposes a secret-token-protected .ics URL you can subscribe to in Google Calendar, Apple Calendar, or Outlook.
- Find the URL in the Calendar Subscription section of the schedule detail page.
- Copy and paste it into your calendar app as a new calendar subscription.
- The feed covers a rolling 60-day window and reflects overrides automatically.
- Regenerating the token (not currently exposed in UI — contact support) invalidates old URLs.
The URL contains a private token. Treat it like a password — anyone with it can read the schedule.
Incident List: Assignee Visibility
The incident list now shows the assigned team member’s name in the assignee badge alongside the acknowledgment status (✓ acknowledged / ⏱ pending).
Alert Log
The schedule detail page includes an Alert Log so you can review actual delivery attempts for that schedule.
The log can show entries for:
- Assignment alerts
- Escalation alerts
- Shift Start alerts
- Test alerts
For each row, you can review:
- when the alert was sent
- the event type
- which user received it
- which channel was used
- whether delivery succeeded or failed
This is useful when debugging “who was notified?” questions during an incident or when confirming that an escalation actually fired.
Because some delivery channels write asynchronously, you may occasionally see a short delay before the newest test alert row appears.
Alert Routing
If a schedule is linked to a status page, you can create routing rules so incidents affecting that page — or a specific component on that page — route to this schedule.
- Page-level rule: applies to incidents on the linked status page generally
- Component-specific rule: applies only to incidents affecting one component
Component-specific rules take priority over page-level rules.
The editor prevents you from adding the exact same route to the same schedule twice. If a route already belongs to this schedule, the option is marked as already added and the add action is disabled for that selection.
If that route currently belongs to another schedule on the same status page, adding it here reassigns the route to the current schedule.
Notifications vs On-Call Assignment
On-call scheduling is about ownership and escalation (who is responsible right now).
Notification channels (Slack/Discord/Telegram/PagerDuty/webhooks/email, etc.) are about where alerts get delivered.
- Notification channels overview: Notification Channels Overview
- PagerDuty integration: PagerDuty Integration
Troubleshooting
- Where did the old On-Call menu go? Shared schedule management moved to Teams → select a team → Operations → On-call. The main dashboard entry is now My On-Call.
- On-Call unavailable: schedule creation is plan-gated. If your plan doesn’t include it, you’ll see an upgrade screen.
- No status pages in the new-schedule form: the selected team has no linked status pages you can manage. Link a page to the team first.
- Schedule is read-only: team members can view team schedules, but only the account that owns a schedule can edit it.
- The Rotation Members + button seems inactive: it opens the inline Add Member composer just below the member list. Scroll slightly if needed, or click Cancel to collapse it again.
- Schedule appears under the wrong team: schedules are grouped by their linked status page. Check which teams have access to that page.
- No one is assigned: ensure the schedule is active, has members, and is linked to the correct status page.
- Times look off: double-check the schedule timezone, the rotation start timestamp, and which timezone is selected in the calendar header. The next-handoff badge reflects the currently selected display timezone.
- Escalation not firing: verify an escalation policy step is configured and the incident is not already acknowledged or ended.
- iCal feed not updating: calendar apps cache feeds — most refresh every 12–24 hours. Force a manual refresh in your calendar app if you need immediate updates.